3.30.2016

DIY School Photo Display

Looking for a way to show off your children's school photos? 
A little elbow grease, paint and hot glue is all you need!

DIY School Photo Display - LeroyLime


I've been eyeing the cute skinny photo holders at Michaels and 
didn't want to fork over the $20 + for one, even with a discount code, 
mine was much cheaper to make and it always feels great to tackle
an easy DIY project!

DIY School Photo Display - LeroyLime

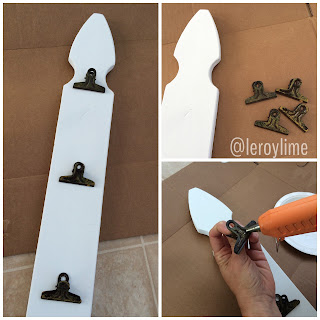
All you need is ONE wooden picket fence post (under $2), 
paint - I used Waverly White Chalk Paint I had on hand, and a bag of clips, 
you can use wooden clothes pins too if you'd like.

DIY School Photo Display - LeroyLime

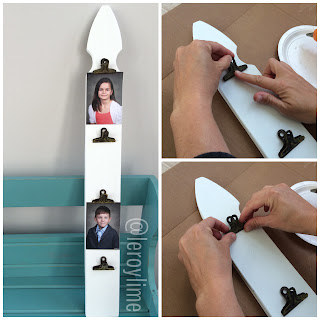
You can trim your board down but it's not necessary, all depends on how many photos you want on your board. I sanded down the edges quickly and then slapped on a coat of Chalk Paint. Warmed up my hot glue gun and stuck my clips down. 

I screwed two short screws into the back and added a bit of wire for easy hanging on our family command center. You can use the top of a soda can as well but I didn't have any on hand. 

DIY School Photo Display - LeroyLime

Easy peasy and way less than $20, a total win in my book!

3.25.2016

Friday Favorites - Week 313 - Easter & Spring

It's Friday! Hope you have all have had a fantastic week. We've been enjoying our stay-cation, during Spring Break and getting lots of Spring projects and DIY finished around our home. I'll be blogging about them all in the near future...until then, I can't wait to see what you've been up to!

This week I'll be featuring some Easter and Spring goodies from the link party last week, please swing by the featured blogs and show them some love!


Hosted by:


Thanks again for joining us - Please link up below!


3.21.2016

Easy Easter Decor

A few simple decor changes will get your home ready for Easter. Just remember it doesn't have to be complicated, crazy or cluttered. You can achieve simple Easter decor easily!


I picked up this large cage from Home Goods in the clearance section for under $20 and most times it's empty, sitting in a corner. This year, I decided to put a few bunnies (that I got on clearance last year AFTER Easter) in the cage as decoration. 


Instead of just setting the bunnies directly onto the floor of the cage (I figured they'd get lost among the eggs), I wrapped an empty box in brown paper and laid some green moss on top randomly, that I had left over from another project. We always have gobs of plastic eggs, so I asked my five year old to pick out the pastel ones and then lay them around the bunnies. I think he did a great job!


Sweet bunnies all nestled in their new home.


 The painted egg banner was one my kids made a few years ago, you can see the original post HERE, I just pulled it out of our Easter box and hung it up, still looks as good as the day they finished painting it!


The Easter print, I believe I scored online for $2.99, the frame I had and it was already painted green...score! A simple wire basket with a few large ostrich eggs and a clearanced bunny from last year. 


I couldn't pass up the white wooden bunny garland, in the Target $ section this year for only $3. Also the golden bunny sign $3, not sure when the $1 section turned into a $3 section. I never did find one of the green moss bunnies everyone and their Mother seemed to score at Target but it's okay because I'm partial to wooden bunnies, they are less likely to break in moves. The rest of the mantle decor I already had, just rearranged a bit for Easter.

HOPPY DECORATING!

3.20.2016

Wooden DIY Mantle Project

When we moved in we fell in love with our fireplace wall...but the mantle, a bit small for my taste just seems to be camouflaged and didn't show it's best self.

Wooden DIY Mantle Project - LeroyLime


So...I hinted another fun project to my dear handy hubby and the following photos will show you what my man went through until we were happy with the final result! 

Wooden DIY Mantle Project - LeroyLime

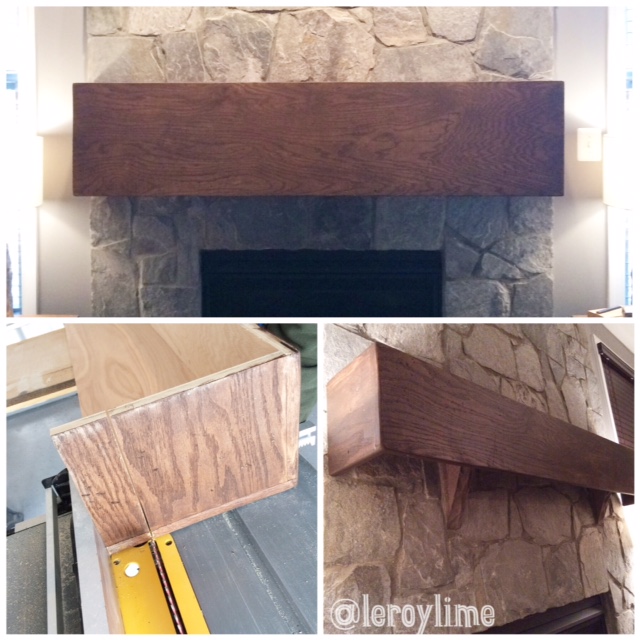
The first sketches we drew and visions in our head were thus that a large chunky (or so it seemed) piece of wood would cover the current stone mantle shelf. A large box was created and after putting it online asking friends what they though we were building next...a coffin...lol, okay but nope.

Wooden DIY Mantle Project - LeroyLime


A single sheet of 1X16 Red Oak was perfectly cut, sanded and pieced together. It was stained, we mixed two stains together before applying (I have no idea what color they were, sorry) and then we placed said mantle into place...

Wooden DIY Mantle Project - LeroyLime

Wooden DIY Mantle Project - LeroyLime

After taking an online poll, trying out our new 'box' for a few days, we decided we overestimated how big we thought the mantle should be. So my sweet dear hubby cut down his masterpiece a few different times, taking off the entire bottom section that hid the original mantle corbels. 

He also glued in a section of 4X4 that sits just below the original stone mantle, inside the wood mantle, so it's quite solid but removable if future buyers wanted to go back to the original stone.

Wooden DIY Mantle Project - LeroyLime


I love that the bottom is now open, so that we can hang command hooks inside for stockings, a fun alternative to stocking holders that are heavy and sit on top of the mantle (and are a bit dangerous with small children, I might add).

Wooden DIY Mantle Project - LeroyLime

I was so excited to decorate the new mantle that I didn't get around to adding a thin coat of Poly until this Spring and now we are ready for Easter!

Wooden DIY Mantle Project - LeroyLime


3.18.2016

Friday Favorites - Week 312

Happy Friday everyone! I'm so very excited to announce that LeroyLime has teamed up with some very lovely ladies and I'll be a new co-hostess for the Friday Favorites Linky Party! This is turning out to be a fun Birthday month indeed. Speaking of Birthday's, don't forget to enter my Happy Birthday Banner Giveaway HERE

Friday Favorites Linky Party - LeroyLime

Hosted by:


Now, let's get this party started! - please link up below


3.17.2016

St. Patrick's Day Banner and Pot of Gold

Happy St. Patrick's Day!! 

This week celebrates the classified school employees including secretaries, custodians, bus drivers, maintenance crews, computer technicians, teacher assistants and food service employees, among others. So I whipped up this fun little set for the secretaries at our school. 

St Patrick's Day Banner & Pot of Gold - LeroyLime

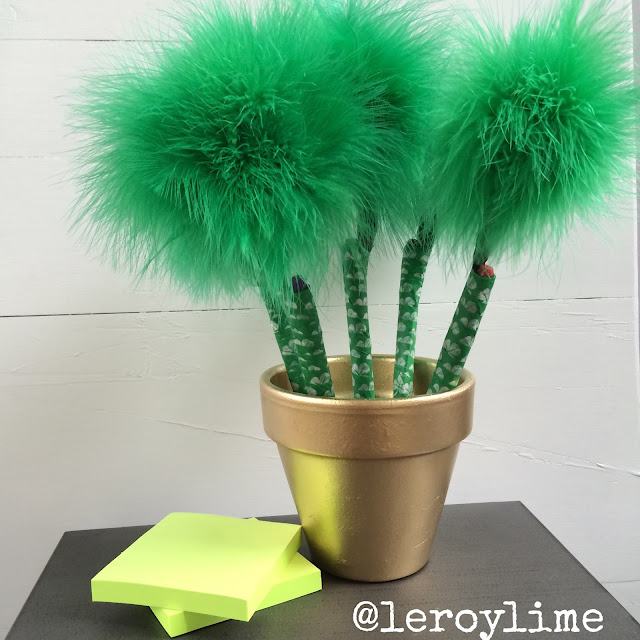
A fun St. Patty's Banner and Pot of Gold filled with fun green fluffy pens that would look super cute for Dr. Seuss week as well. Don't they looked like something from Whoville?!

St Patrick's Day Banner & Pot of Gold - LeroyLime


I picked up a simple clay pot and gave it a quick makeover with a touch of gold spray paint, punched out a paper circle to cover the hole in the bottom of the pot and set it inside, to keep the little split peas from spilling out the bottom.

St Patrick's Day Banner & Pot of Gold - LeroyLime

The green shamrocks were uber inexpensive at $1 a bag for 5 of them, I picked up two bags and turned the rest into simple necklaces in case the ladies forgot to wear something green. My 
crop-a-dile easily punched through the foam shamrocks, so they could be strung along with the paper pennants for the banner. *tip - take a small piece of washi tape and wrap it around the end of your bakers twine for easy threading. Gold Glitter Letters added a nice whimsical touch.

St Patrick's Day Banner & Pot of Gold - LeroyLime


Next, the fun fluffy pens!! The green fluff balls were 40% off at our local craft store, so I picked up 5 and cut the wires down a bit to fit the pens. Using green floral tape, I wrapped the two together. If you're not a fan of the slight stickiness of the floral tape, wrap again with washi tape and seal down the ends with a small glue dot.

St Patrick's Day Banner & Pot of Gold - LeroyLime

Isn't it such a cute set? The ladies were THRILLED when they saw the fluffy pens. A simple and thoughtful way to say thanks to someone who supports your children throughout the school year. These would also be great for teachers too!! 

St Patrick's Day Banner & Pot of Gold - LeroyLime

 Don't forget to wear something green today!
_________________

An interesting fact:
The odds of finding a four leaf clover on your first try are 1 in 10,000
Good luck!

3.09.2016

Birthday Banner Giveaway

Update: Giveaway CLOSED - the winner has been notified!! 
~~~~~~~~~~~~~~~~~~~~~~~~~
To celebrate the wonderful month of March, my Birthday (today) & LeroyLime's quite popular Minecraft Birthday Party Post...

Minecraft Birthday Banner Giveaway #leroylimegiveaway

I'm giving away this Happy Birthday banner to one lucky reader! Please follow LeroyLime on any form of social media and comment below how you follow. Giveaway ends March 20th 12AM EST. You can also share this post using the hashtag #leroylimegiveaway
Good luck!


This giveaway is in no way sponsored, endorsed administered by, or associated with Instagram or Facebook. One winner will be chosen randomly & Banner will be mailed to winner. US residents only. 

Giveaway runs March 9 - 20th 2016. 


3.02.2016

Guest Room Reveal

I've always loved having a guest room, a place for company to relax and stretch out when they visit. A door they can close so they don't feel like they have to make their beds everyday or pick up their small space. Just a space that is theirs for the time they are guests in our home. But with each baby born to our family, the guest room was constantly turned into the newest nursery. With the purchase of our current home, I was very adamant that it would have an extra bedroom for guests and I'm so happy with the end result. I hope our guests enjoy it as much as we do. 


A refreshing pallet of paint on the walls. White behind the headboards, which my handy hubby made and are adhered directly into the studs. The shelf used to be black, hubs made that too, and is actually two shelves that we hung together to make one long one in this house. The bedside tables were from my parents, I still need to paint those. The twin beds can easily be pushed together to make one big bed or they can be kept separate if guest want their own sleeping space. 


This sweet sign and paper wreath, I picked up from a really cool antique shop in West Virginia for a steal, it's rather large and I just fell in love with the quote. The vintage cards, that spell out Be Our Guest, I sat directly onto the shelf. They are from my Great Aunt's teaching days. 


 Grey T-Shirt Sheets from Restoration Hardware Outlet and a simple white Quilt from Target. The ends of the beds are also adorned with a fuzzy grey throw blanket from Restoration Hardware and if you wait until after the holidays, you can snag them on sale! 


An old mirror from the Old Luckett's Store in Leesburg, VA, it had already been painted...total win! 
Simple white curtains from IKEA, the room is in the basement and has one egress window. The blinds are dark and I wanted to keep the rest of the room relaxing and bright. The other walls beside the headboard wall are all painted Gray Frost D57-3, I love how the color changes throughout the day. Sometimes it looks more gray and other times more blue. 


The white metal holder I picked up from TJ Max and spray painted it white. It was turquoise and although pretty, not the right color for the space I needed it. All of the hats are from my Great Aunt. I picked up the vintage curling iron at a small antique shop in Austin, TX. And the bottom left photos are my parents Senior portraits. Aren't they cute?!


The old trunk has been handed down through my family. Not sure if it belong to my Great Aunt or my Great Grandparents. The black shoes were my Great Aunts however, she always wore heels, even in her 90's. I printed out our wifi user name and password so it would be easy for our guests to find. The jar is filled with old wooden spools, hat pins and tatting items. Some have been passed down from family, others I've picked up here and there at antique shops.


The metal key hook used to be dark, I spray painted it and by accident moved it before it was dry....some of the paint smeared off so I took a rag and wiped off a bit more to give it that vintage appeal. The tiny outfit was my older brothers. 


My Great Aunt used to teach all of her students to play the xylophone.  She used to play a much larger one with 4 sticks at a time and was even on the radio. A fun bit of history! I thought it would be fun to hang on the wall with the rest of the vintage goodies.


I most recently acquired this trunk, it was already painted white with the lid painted shut but not a problem since I just wanted it for guests to put their luggage on. 

I hope you enjoyed the guest room reveal, what was your favorite bit?