7.30.2015

Playroom Makeover


Playroom Makeover with Leftover Paint

Our basement playroom was in need of a little
pizzazz, so out came the painters tape and all the 
leftover paint that has been used around our home.

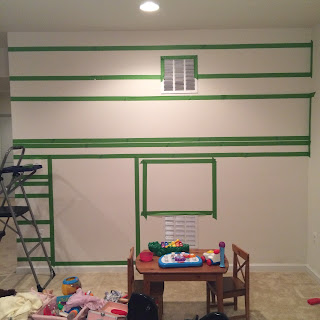
Here is the wall...

"Before"

...and here is what I taped out. I used a large level to
add marks on the wall and then taped along the wall,
matching up to the pencil marks (making sure I would 
be covering them with paint).

I knew I wanted the kitchen in the right corner, so
decided to leave that blank...

Playroom Makeover with Leftover Paint

A chalkboard spot for drawing on the left, I painted
over every section twice before peeling off the tape.

The yellow spot is a little too pale for my taste but 
it's where the magnetic board is hung with the kids
fridge magnets below in a basket. 

So a few hours of taping one day, painting and 
reorganizing the toys the second day and now 
there is a little more cheer in our dark basement!

Playroom Makeover with Leftover Paint
"After"

7.25.2015

40th Birthday Gift Idea

We all hate getting older, when we actually are older
but somehow those Birthday's sneak up on us...
year after shining year.

My good friend just recently celebrated a milestone 
Birthday and to celebrate her jokester self, I thought
sending her a pot fill with suckers would at least make
her laugh...it did!

40 Sucks! 40th Birthday Gift Idea

"40 SUCKS"

I picked up a terracotta pot and foam ball from 
a local craft store and a mondo bag
of suckers (thank you Sam's Club) and got to work.
I already had black chalkboard spray paint and gold
lying around, as well as frog tape.

First I taped off the top of the pot where I wanted 
the gold to go and spray painted two coats of the black
chalkboard paint on the bottom of the pot.

40 Sucks! 40th Birthday Gift Idea

After the paint was dry, I peeled off the tape and 
carefully taped off the bottom, black portion. I gently
pressed the tape onto the bottom, so it didn't peel off
the paint and then quickly sprayed the rim and inside
the pot a pretty gold.

40 Sucks! 40th Birthday Gift Idea


Two coats, drying time and then it was time to 
plant some suckers!! I started at the top and worked
my way around. I tried to stick to the Birthday
girl's favorite colors but had to add a bit of green 
to the bottom, we will just call them leaves.

40 Sucks! 40th Birthday Gift Idea


Next a little free hand drawing with chalk markers, 
not super fancy but it gets the job done cause really
...40 SUCKS!! ;)

40 Sucks! 40th Birthday Gift Idea


7.23.2015

Ombre Party Ideas

Parties don't have to go all out to pack a big punch
as you can see from these very simple Teal Ombre 
Party decorations. If you stick to a simple color
scheme, then your sweet touches are able to stand out
and take center stage.

Ombre Party Ideas

 I worked with my good friend Megan, on the decor for
her daughter's Graduation party. Megan happens 
to be an AMAZING photographer and lives in Oregon.
(Look her up if you are the area and need photos, she
is seriously just so very talented!)

Ombre Party Ideas

 At first we were going to go with blue and yellow,
high school colors...but with Megan's 
impeccable taste, we both agreed those were
a bit too harsh for the soft party look she was going for.
We instead agreed on her daughter's favorite color and
turned it into an ombre party with bits of glittery gold
for just the right amount of girly flair.

Ombre Party Ideas

A simple white sheet cake, wildflowers in a
jar and photographs tucked under a glass top table, 
that can be viewed but protected from sticky fingers.
Megan hung a few paper puff balls from the ceiling,
which added a bit more color to the space
and created a fun whimsical effect.

I'd call this party decor a success! "YAY"

Ombre Party Ideas

If you are looking to book a photography session for
your upcoming Senior, Megan is booking now...


Photos taken by the lovely Megan Morgan Photography
Ombre Party Decorations made by LeroyLime on Etsy

Garden Fence & Gate

Growing up on a farm in Iowa, you'd think I have a 
natural green thumb...sadly, you are wrong. But somehow, 
I've managed to grow a small garden in our backyard, 
canyoubelieveit. You can find the original post and see just
how much our little garden has taken off since we
first planted everything HERE.

DIY Garden Fence & Gate

With a bountiful of greens however, come a few late
night stragglers, nibbling away at our pretty 
leaves...the buggers! I picked up a roll of green
fence and a few posts from Home Depot and my 
DH (dear hubby) sweetly installed a barrier 
 directly around the box. Ahem.

DIY Garden Fence & Gate

With no way of getting to the garden, he widened
the fence, adding a few extra poles and a quick gate 
for easy access. For ease of disassembly if needed,
the fence is attached to the posts with zip ties.

DIY Garden Fence & Gate

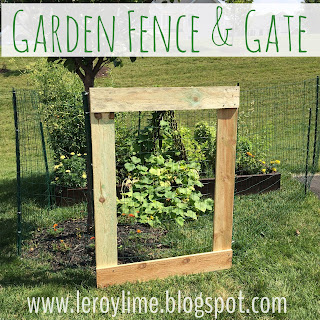
 The gate was made using 3 fence boards, the tops cut
off, one of which was chopped in half.  A few quick
 zaps of the nail gun with a few screws for reinforcement, 
at the corners. A small piece of fence was stapled
onto the back and the gate zip tied to one of the posts. 
The gate needs to be stained to match the 
garden box but so far, it's been keeping the critters 
out and the garden is able to flourish inside. 

DIY Garden Fence & Gate


7.09.2015

Rocking Chair Makeover

I picked up this sweet little rocking chair for $6 at a
second hand store in North Dakota a few years ago and 
it finally got a much needed facelift with a bit of 
Americana Decor chalk paint.

Rocking Chair Makeover Before & After

I used a sanding block to smooth the rough edges,
cleaned off the chair with a damp paper towel and
let it air dry for a bit before painting.

Rocking Chair Makeover Before & After


Rocking Chair Makeover Before & After

I used Americana Decor Chalk paint, called Refreshing,
a beautiful and truly refreshing mint color.
I found the paint at Michael's (using a 40% off coupon)
and Home Depot also carries a few color choices.

Rocking Chair Makeover Before & After

The first coat was easy to apply...I'm a bit of a messy
painter when it comes to chalk paint if I'm planning
on sanding afterward, like I did with this piece. 
Two coats of paint were applied so that none of the
wood grain would show through, at least not until
I wanted it to!

Rocking Chair Makeover Before & After

I went through a couple of sponge brushes on this
project, they kept getting caught on the small
areas and ripping but otherwise, worked great.

Rocking Chair Makeover Before & After

The second coat covered the wood that was 
showing through and I used a sanding block 
to distress the edges just slightly.

 Rocking Chair Makeover Before & After

Since this chair will be used by little ones I didn't 
really care to wax and rewax when needed, so I pulled
out my can of Minwax clear/satin Polycrylic. I used a
water based brush to apply. You only need a little bit
on your brush at a time since the Poly dries quickly 
and you want to minimize drips. A double coat of Poly
was added to the seat and a few places I know will 
get more wear and tear.

Rocking Chair Makeover Before & After

Now to put this sweetheart back in my now two
year olds Vintage Circus bedroom!

Rocking Chair Makeover Before & After

______________________

I've linked up to the following linky parties: